
- Provision Your Azuracast Server
- Azuracast Provision Steps
- Create DNS A-Record Pointing to Azuracast
- Azurcast First-Steps
- Station Creation Steps
- Connect Your Subdomain to Azuracast
- Securing Azuracast with SSL
- Configure Relay Server
- Enable and Manage Streamers/DJs Function
- Edit Mount Point and Format
- Create Your Primary 'Station' Stream
- Back Up Your Azuracast Config for Easy Recovery
- I Like Big BUTTs and I Cannot Lie
Provision Your Azuracast Server
There’s a good chance you jumped to this post from this post and you’re knee deep in Automating the Entire Process of Installing Rivendell with Advanced Features on Ubuntu 22.04 in the Cloud, when you discovered you needed Azuracast and BUTT to pull all the magic together. If so, welcome back! If not, start here for the full context.
It looks like more work than it really is, but details matter, and I find it easier to walk through lists of steps than parsing long paragraphs, so you’ll notice that I explain the process and then also give you quick reference bullet points and screen-grabs along the way. Let’s dive in!
TIP: If you haven’t picked a VPS host yet, and found this free article to be helpful, consider using DigitalOcean. You can even use my referral link to support the project. 🙏🏽 To get you up and running quickly, let’s use an AzuraCast 1-Click Droplet on DigitalOcean.
What you’ll need:
- A DigitalOcean account for the 1-Click install (or you could build the server manually, anywhere you want).
- Domain name
- Domain host to add a DNS record
- These aren’t absolute requirements, but are recommended for better performance
To get started, click the “Create” button and then tap “Droplets” from the drop-down menu. On the Droplet Creation page, choose the region closest to you. In the 3rd section down, where it says “Choose Image,” click on the “Marketplace” tab. In the search box that opens, type: Azuracast.
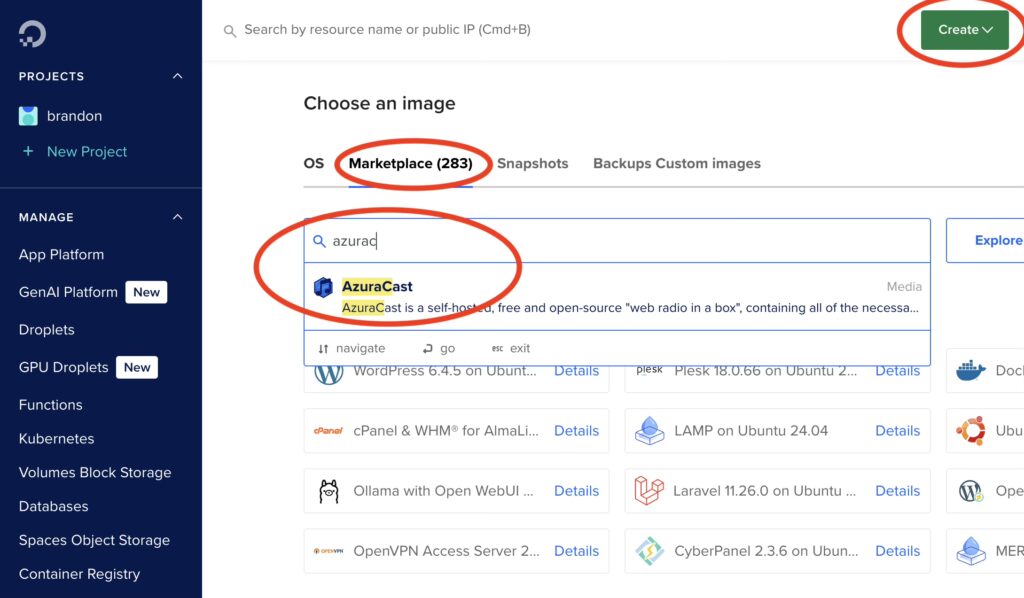
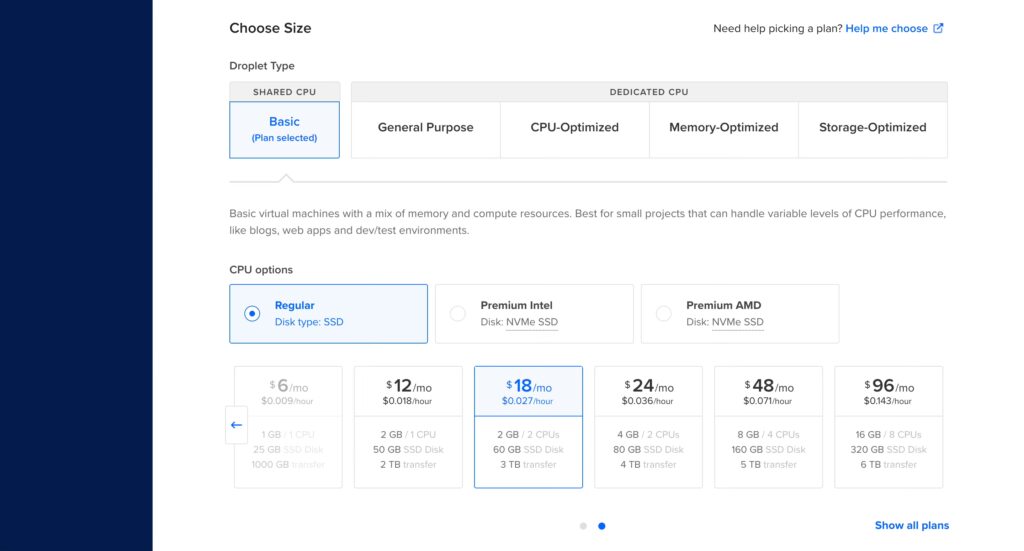
The AzuraCast image will pop up before you finish typing. Click to select it, then move down the page to choose the “Regular” CPU option. You can probably get by with the $12/mo option if you’re only hosting your primary stream, but I recommend the $18/mo option if you plan on adding a “Relay Server” for LIVE Broadcasts. Add your SSH key and click the “Create Droplet” button to finish.
Azuracast Provision Steps
- Click “Create” button in DigitalOcean Control Panel
- Tap “Droplets” in the dropdown menu
- Choose the region closest to you
- Click “Marketplace” tab
- Type: “Azuracast” in the search box
- Tap Azuracast to select the image
- Choose “Regular” CPU option
- I recommend the $18/mo option if you plan to serve your primary stream and a Relay for LIVE Broadcasts
- Weekly backups are optional (Azuracast backups and restores are cake)
- Add or create your SSH key
- Tap “Create Droplet” button
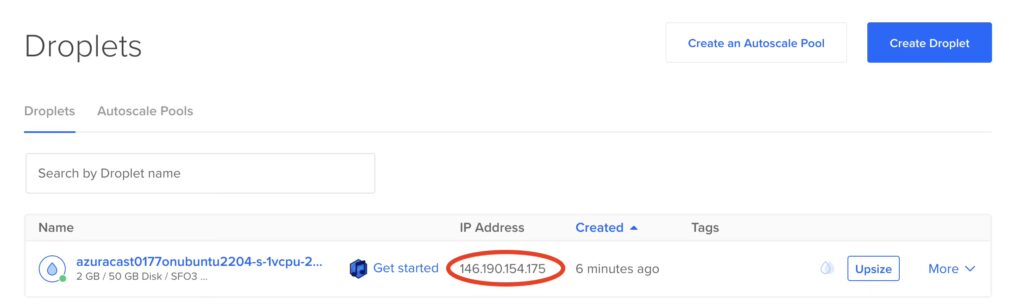
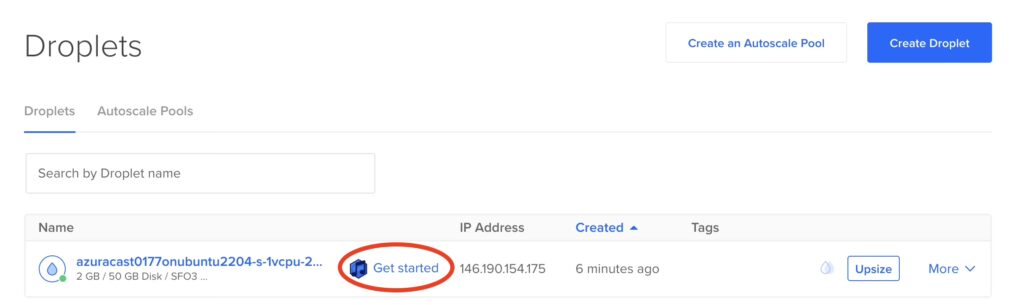
In less than a minute, your new Auracast Droplet will be provisioned. Tap on the IP address to copy it. We’ll need it in the next step.
Create DNS A-Record Pointing to Azuracast
Before we move on, let’s create a DNS A-Record on your domain that points to this server. There are several benefits: besides not needing to remember the IP address; the biggest, is that it will secure your primary stream, so it won’t break your SSL encryption, when you embed it on your website.
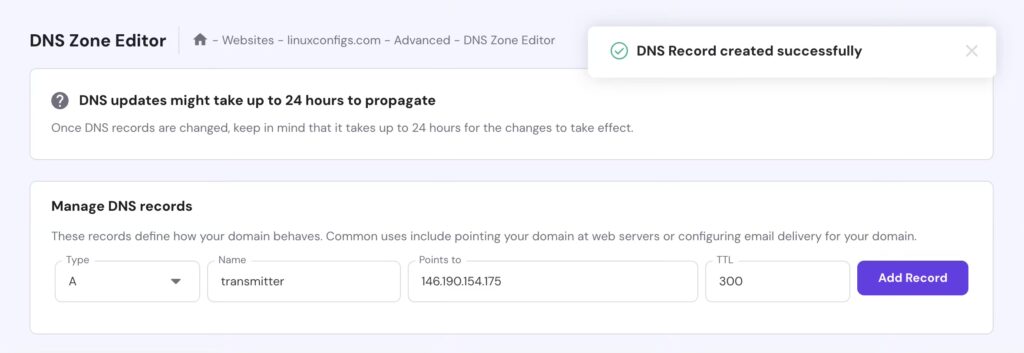
Navigate to your domain host — I use Hostinger — and create two A-Records. Your settings should resemble mine (above). An A-Record allows you to essentially point a subdomain (transmitter.yourdomain.com) to an external resource IP address.
- Type: A
- Name: transmitter
- Points to: [your Azuracast server IP]
- TTL: 300
Repeat the steps here and create a second A-Record that points to your Rivendell Server
- Type: A
- Name: stl
- Points to: [your Rivendell server IP]
- TTL: 300
Azurcast First-Steps
Now, go back to your DigitalOcean control panel and tap the “Get Started” button on your Azuracast Droplet.
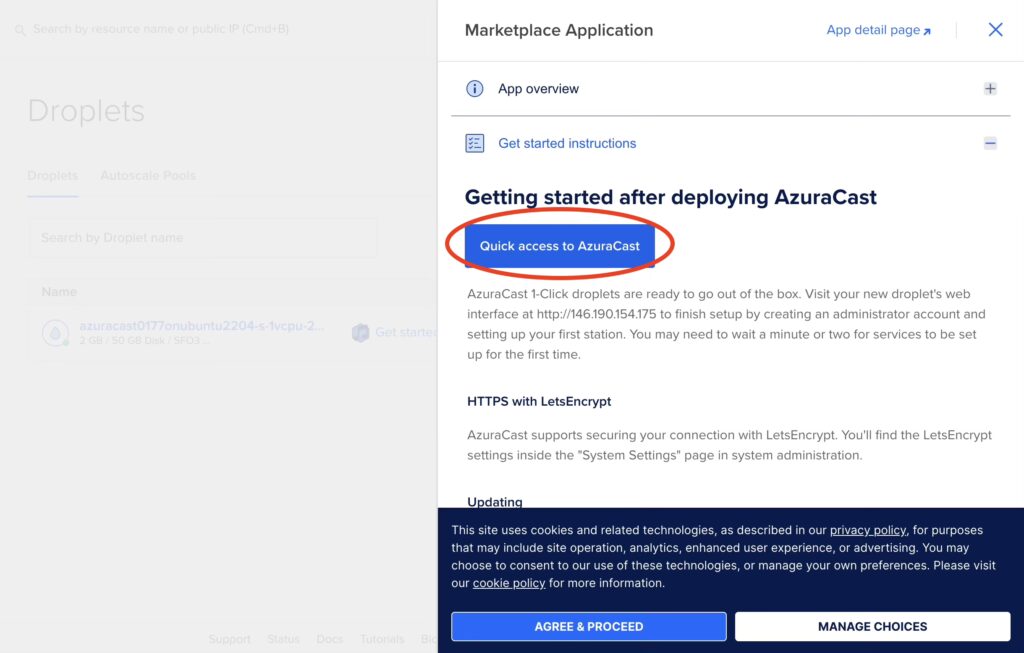
This will open an information panel with a “Quick Access” button. Tap the button to launch the first-run page. By now, the Docker container and background services should already be running, but If the page doesn’t load, don’t trip, give it a few minutes and click it again.
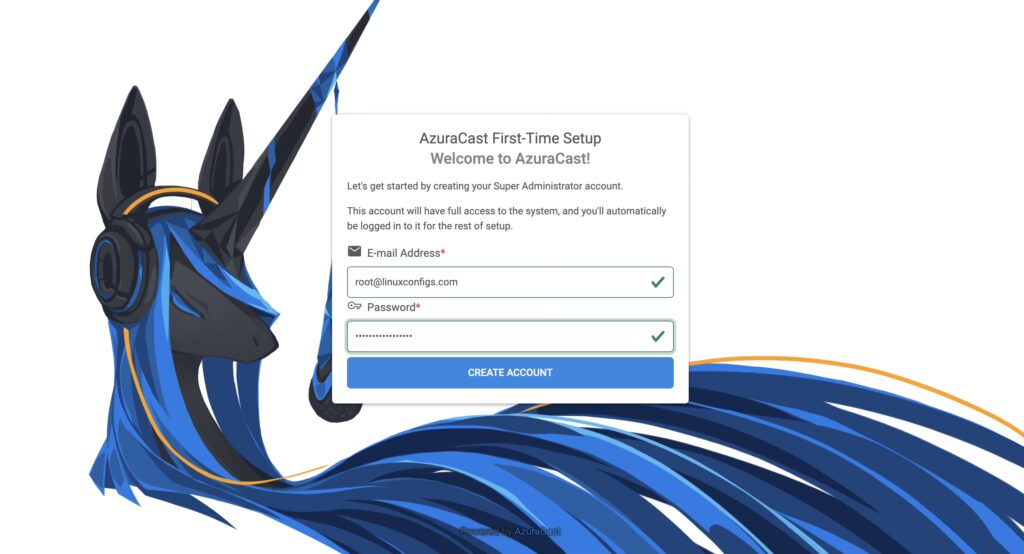
On the next page, enter an email address and password to create your super-admin account.
The process of creating a “station” is the same for your primary stream, but this article will focus on creating your second “station” which we’ll call “Relay Server” — that you’ll use to connect your LIVE remote audio to, as a streaming source with BUTT.
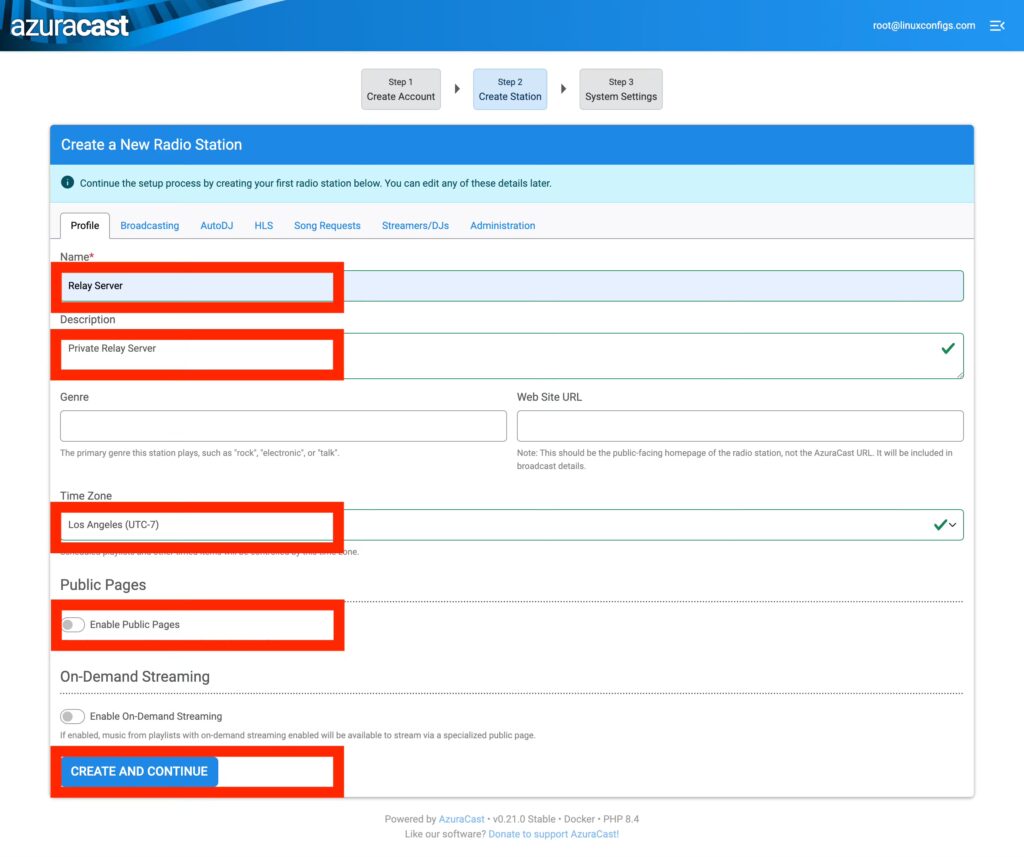
The “Create a New Radio Station” page will open to the “Profile” tab. Fill in the station Name, add a Description, choose a timezone, and disable Public Pages for this station.
Then, hit the “Create and Continue” button. This will bring you to the “System Settings” page where we’ll connect your subdomain.
Station Creation Steps
- Name: Relay Server
- Description: Private Relay Server
- Choose Timezone
- “Disable Public Pages”
- Then, hit the “Create and Continue” button.
- Redirected to the “System Settings” Page
Connect Your Subdomain to Azuracast
Now, let’s connect your new subdomain to Azuracast. The previous step, should’ve redirected you to the “System Settings” page. If you get turned around and need to get back there, just click the “Administration” button in the Azuracast dashboard, then tap “System Settings” under the “System Maintenance” menu.
HEADS UP!
Adding your subdomain and then securing it with an automatic LetsEncrypt SSL cert is a multi-part process. So we’ll bounce back and forth a little, but I’ll break the steps down in sequential order.
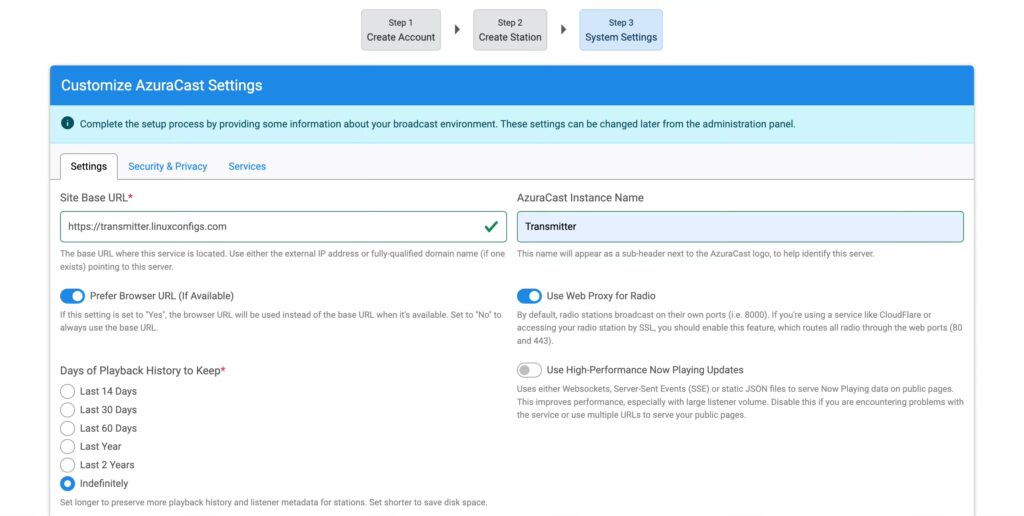
- On the “Settings” tab, add your new FQDN: https://transmitter.yourdomain.com
- Name your Azuracast instance: Transmitter
- Choose playback history retention length: mine is set to: Indefinitely
- Keep the defaults on everything else
- Then, tap the “Services” tab at the top
NOTE: Don’t forget “https://” when you add your FQDN in this step, or you’ll get an error.
TIP: Obviously, you can use whatever name you want, but we’re going with transmitter for consistency.
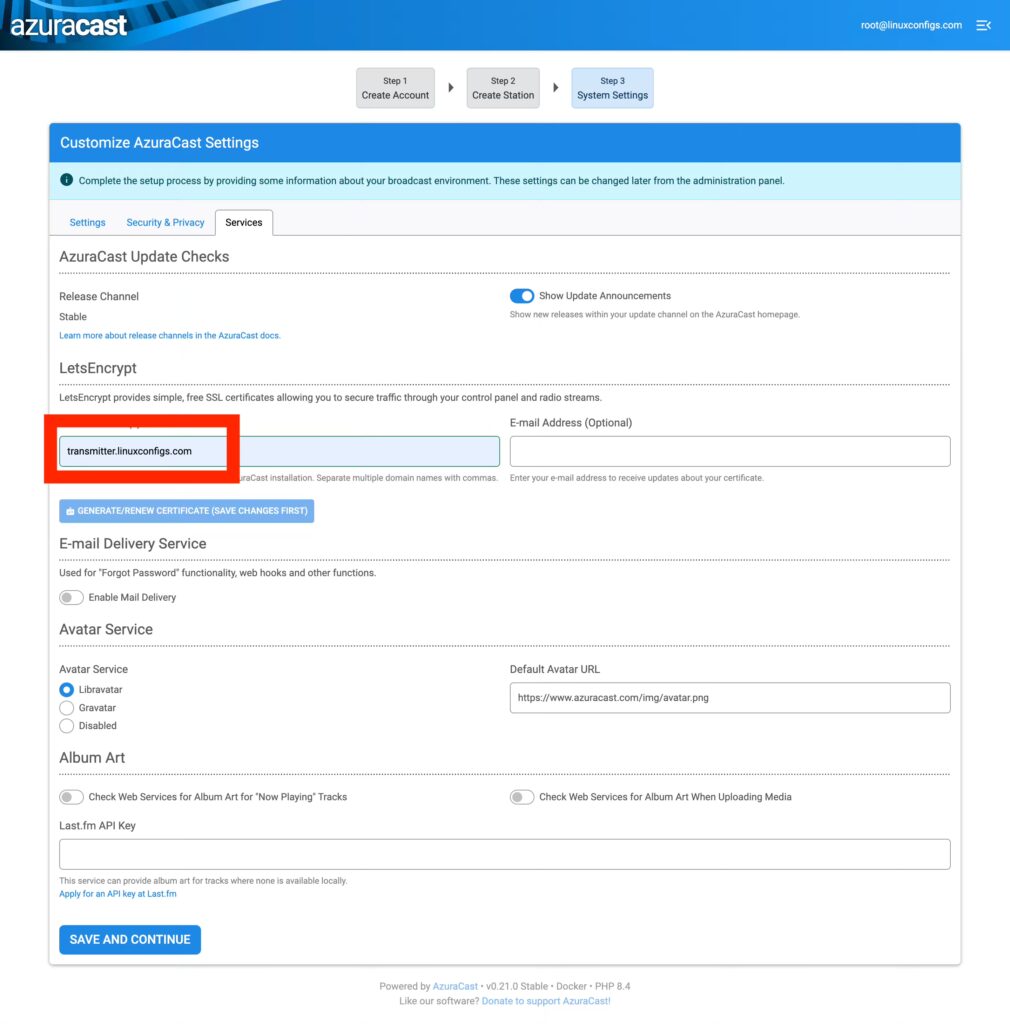
- On the “Services” tab, in the LetsEncrypt Domain Name box: enter your FQDN: transmitter.yourdomain.com (this time, just the naked domain without https://)
- Hit “Save and Continue” button
- This will kick you back out to the main Azuracast Dashboard
NOTE: Don’t try to skip ahead to “Generate/Renew Certificate.” This option is greyed-out until the changes are saved.
Securing Azuracast with SSL
- Click the “Administration” button
- Tap “System Settings” under the “System Maintenance” menu
- Tap “Services” tab again
- Now, you can tap the “Generate/Renew Certificate” button in the LetsEncrypt section
- After a moment, you should see a Log Viewer pop up with some feedback: AzuraCast.NOTICE: ACME certificate process successful. [] []
NOTE: If it didn’t succeed, something is misconfigured (probably DNS, or your A-Record hasn’t propagated yet).
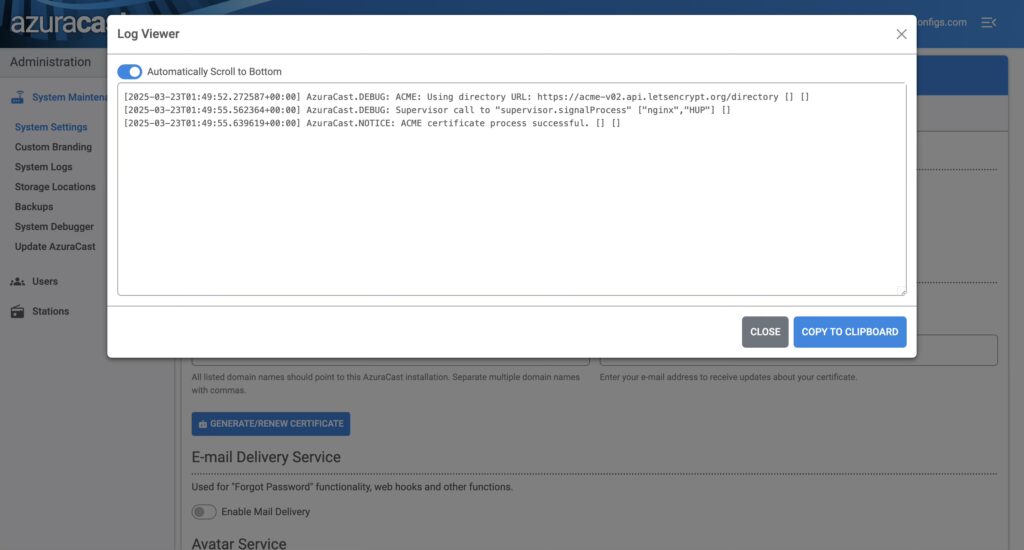
- If it succeeded, Close the log window
- Tap on the “Security & Privacy” tab at the top
- Check “Always use HTTPS” under Security
- Click “Save Changes”
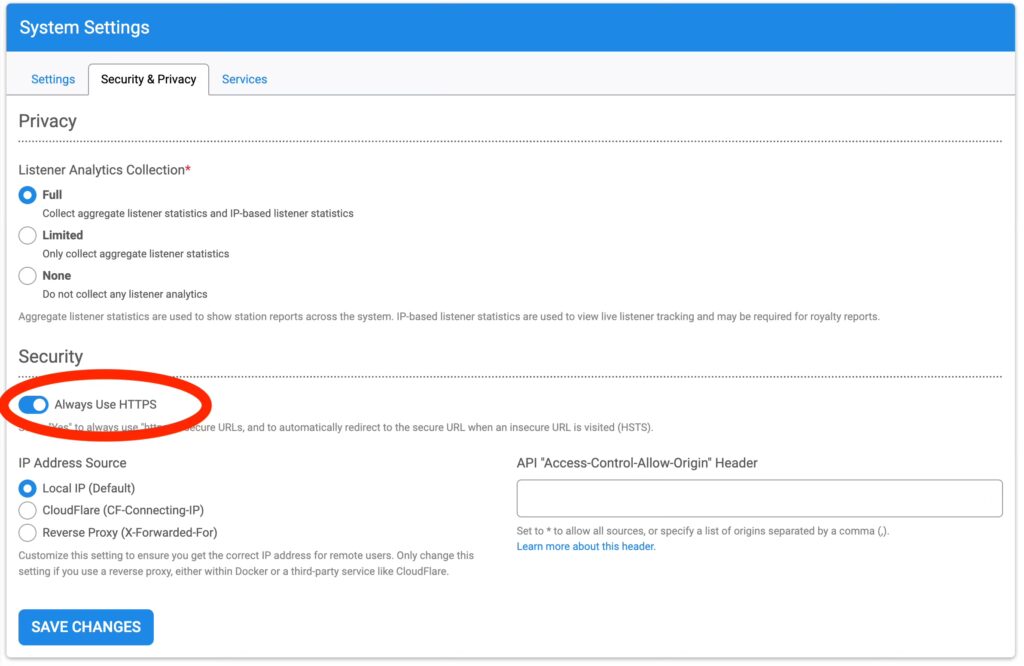
- You will probably get an error. Close the tab and log back in with your new subdomain, instead of the IP address.
- https://transmitter.yourdomain.com
- Now, your Primary on-air stream URL won’t break the encryption on your website!
- Let’s encrypt should automatically renew every 3 months without any intervention.
Configure Relay Server
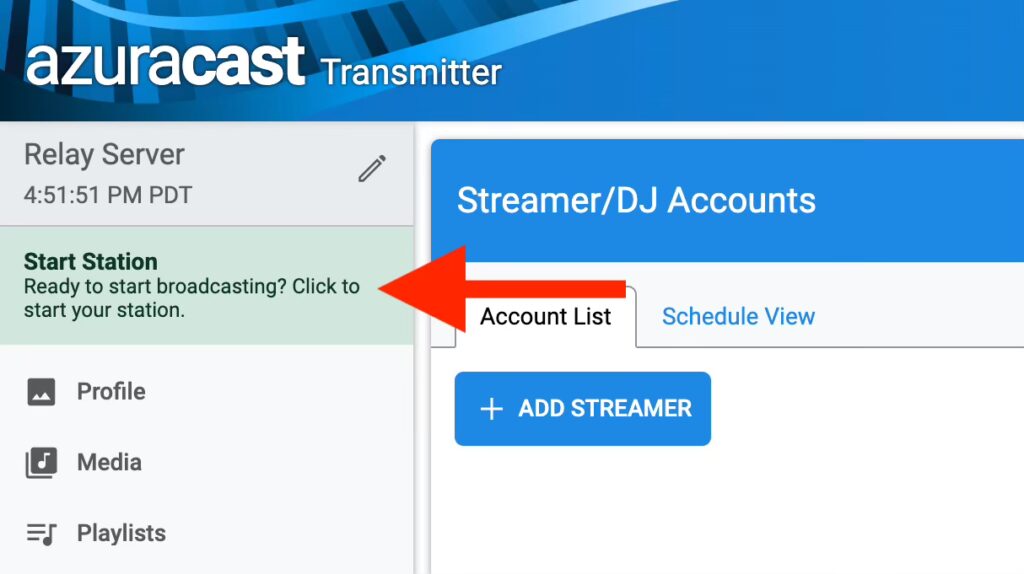
Now that all of that is out of the way, we’re finally ready to configure your Relay Server. On the Azuracast dashboard, click the blue “Manage” button for your Relay Server
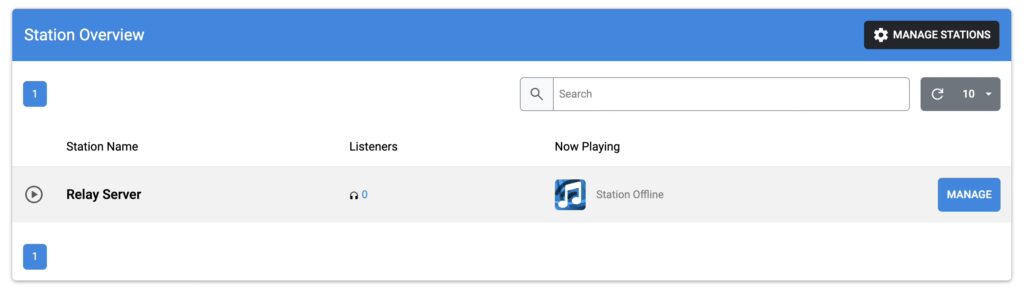
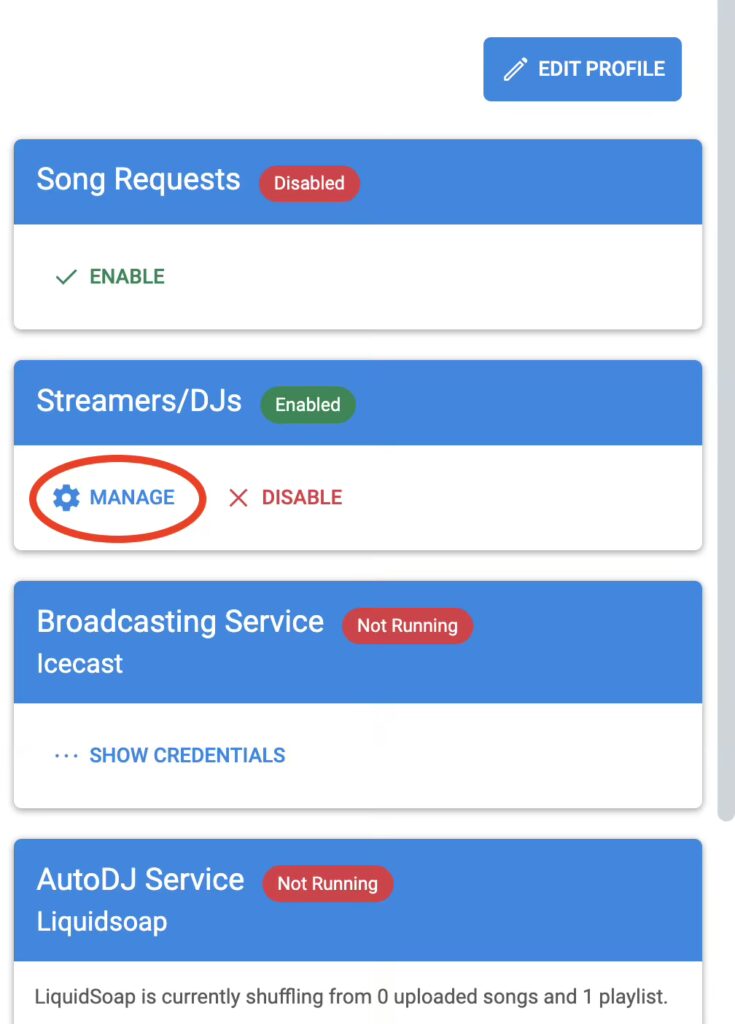
This Relay Server will be the middleman between your remote broadcasts and your Rivendell server. By default, the “Streamers/DJs” option is disabled. Tap to “Enable” it and confirm in the popup.
Enable and Manage Streamers/DJs Function
Now that it’s enabled, tap “Manage” under the Streamers/DJs section. This is where we’ll create a user and get the connection info that you’ll use to connect BUTT with.
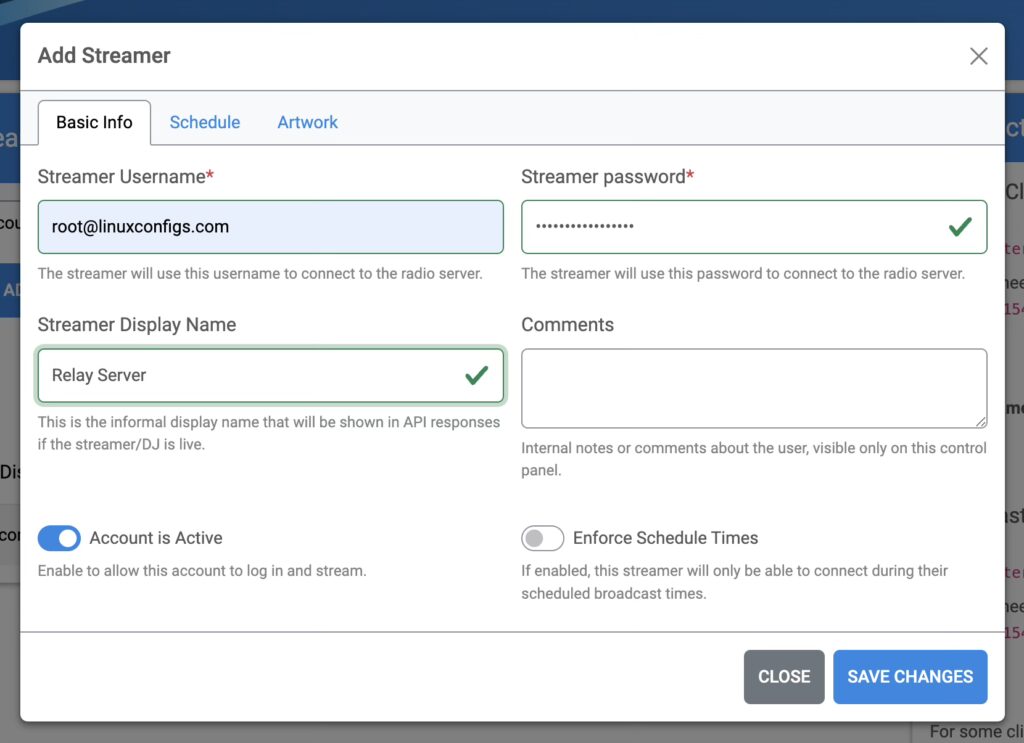
On the next screen, tap the “Add Streamer” button.

Add the following:
- Streamer Username: email address or name is fine
- Create a password
- Streamer Display Name (no one will see this, so it doesn’t matter)
- Leave the other defaults
- Tap the “Save Changes” button
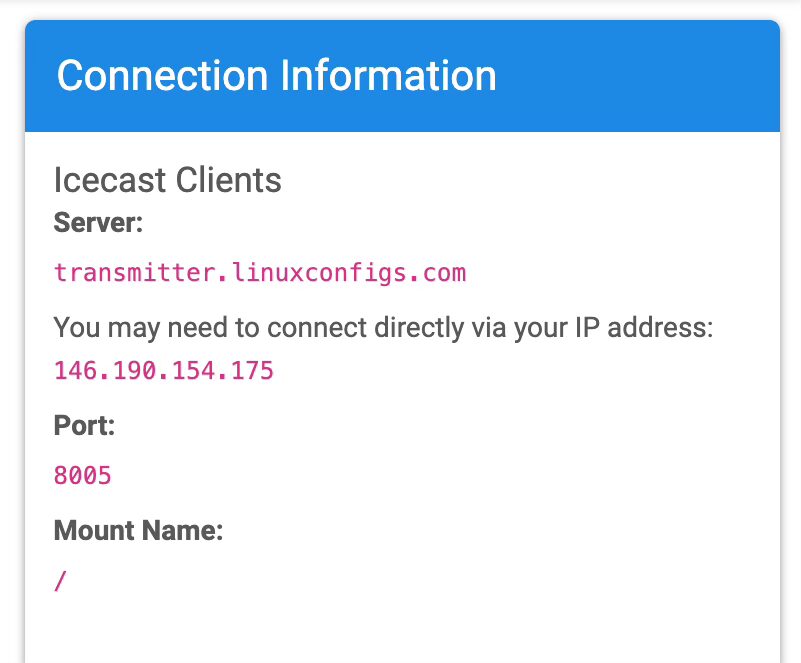
After you save the changes, copy the Icecast Clients info under “Connection Information” in the pane on the right-hand side and set it aside for later.
NOTE: This is the info you’ll use to connect BUTT to the Relay Server from a remote broadcast (outside broadcast, for our friends in the UK). You’ll also need the username and password you created.
Now, we need to start Icecast and Liquidsoap to apply the configs. Tap the green box. It will redirect you to another page where we’ll reload the configs.
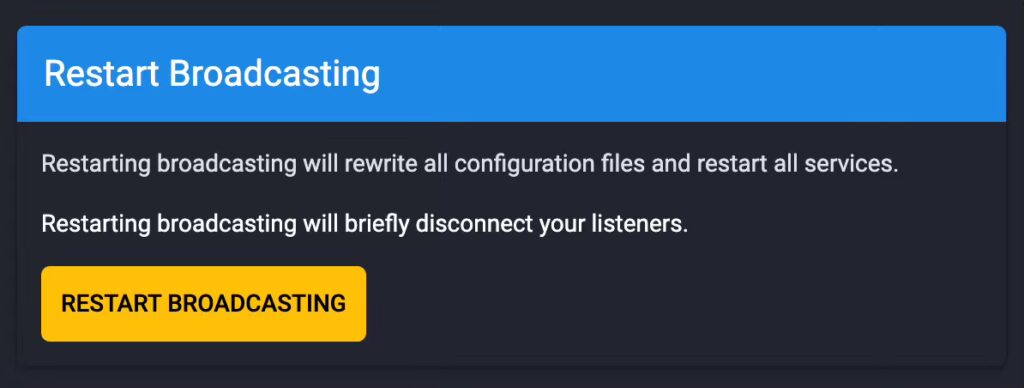
On the next page, there are 2 options: “Reload Configuration” and “Restart Broadcasting.” We want to Restart Broadcasting to re-write all of the config files. Go ahead and tap the yellow button and confirm in the popup.

Edit Mount Point and Format
While not absolutely necessary, I like to clean up the Mount Point and change the default format for the relay, so it doesn’t need to transcode anything when BUTT connects.
The format is subjective, and also depends on the quality of the internet on both ends of your remote (mostly the remote end). You may want to experiment with the settings until you find what works best for you.
From the left navigation menu in your Relay Server “station” profile, tap “Broadcasting,” and when the menu expands, tap “Mount Points,” then tap the “Edit” button.
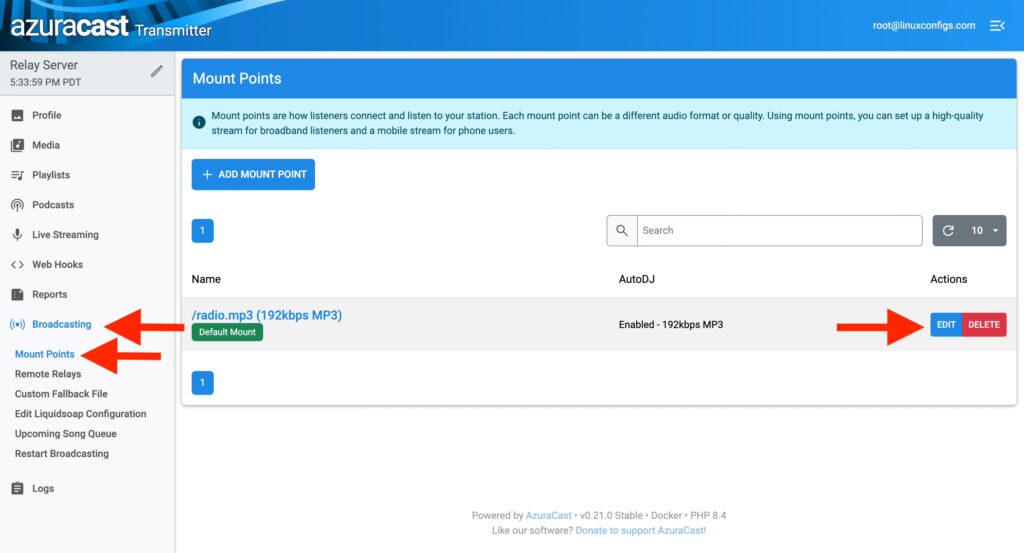
- In the left navigation, tap “Broadcasting”
- When the menu expands, tap “Mount Points”
- Then, tap the “Edit” button
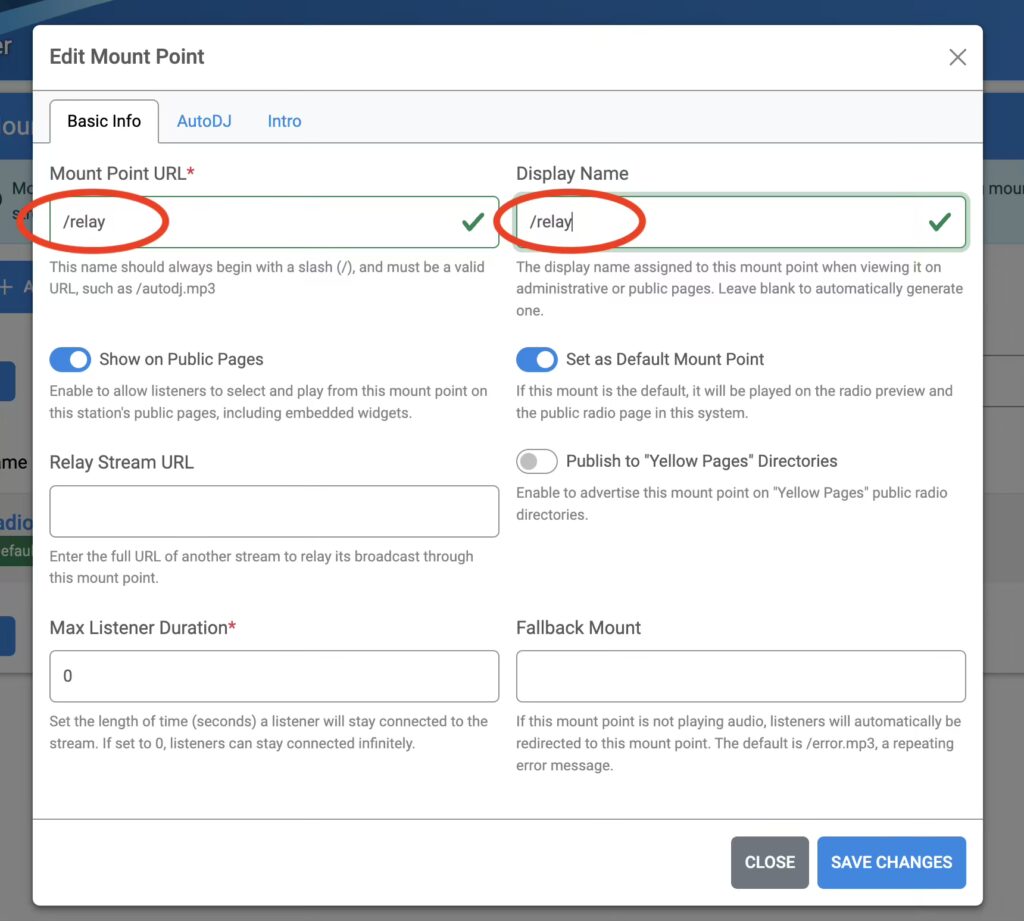
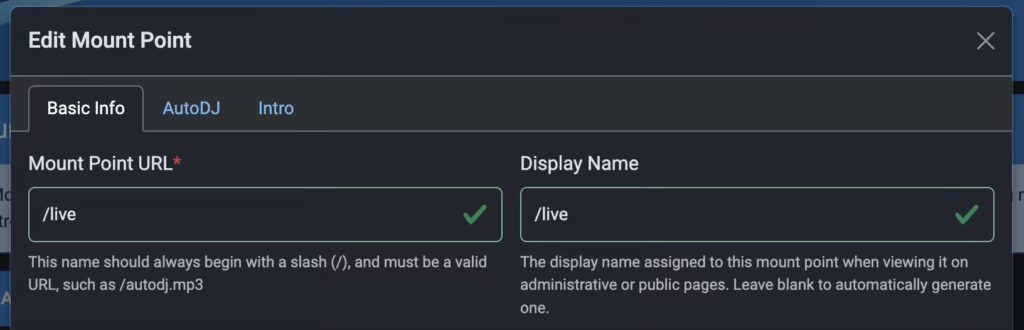
On this screen, rename both the “Mount Point URL” and the “Display Name”
- Rename both to: /relay
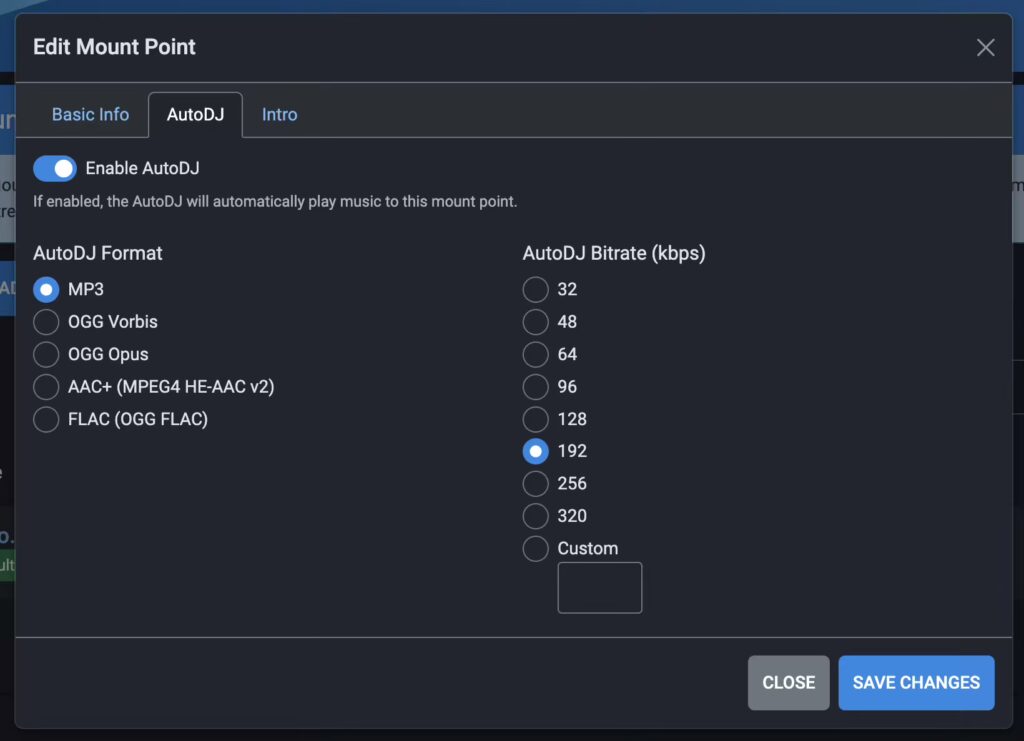
- Then, tap the “AutoDJ” tab
We’re going to change the default format from MP3/192 to OGG/320. This won’t affect your primary on-air stream format. Ogg Vorbis is an open source codec and performs better than MP3 in quality vs. compression. You will want to match these settings in BUTT, so Azuracast doesn’t have to transcode.
NOTE: Changing the format is optional. When you do your site surveys, you should test connectivity and bandwidth before EVERY live remote for stability. If you hear any dropouts or artifacts, then back this down to OGG/192, or try a different codec/bitrate (and check your BUTT settings).
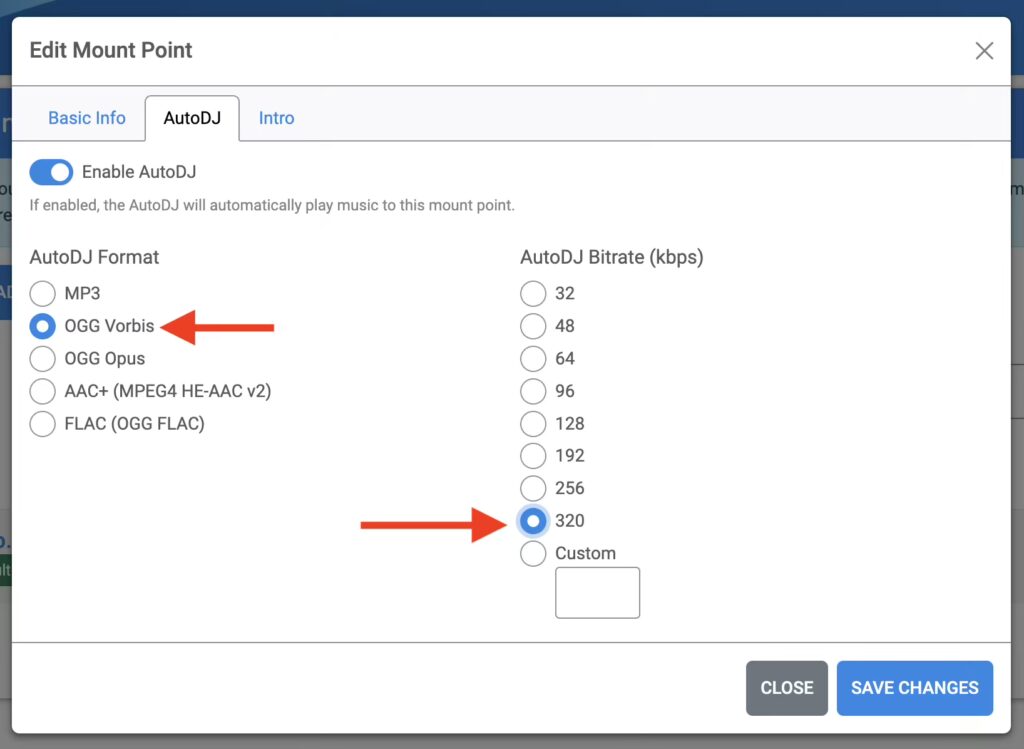
- Format: OGG Vorbis
- Bitrate: 320
- Tap “Save Changes”
- Tap “Reload to Apply Changes”
- On the next page, press the “Restart Broadcasting” button, and confirm it in the popup, again.
REMINDER: Mirror these settings in BUTT. I’ll remind you again in the BUTT section. He said “in the BUTT” Honestly, it wrote itself… 🤣
The page will redirect you back to your Relay Server “station” profile. The second box down, is the Streaming URL that you will paste into VLC on your Rivendell server to capture your LIVE remote broadcast audio.
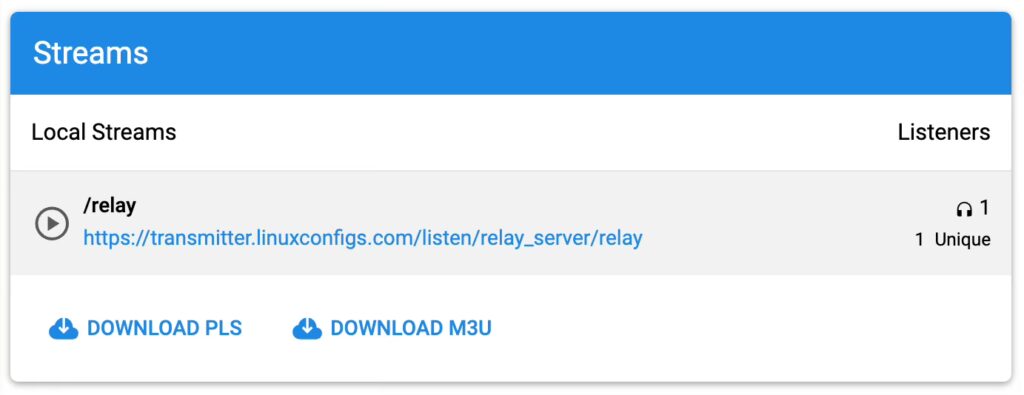
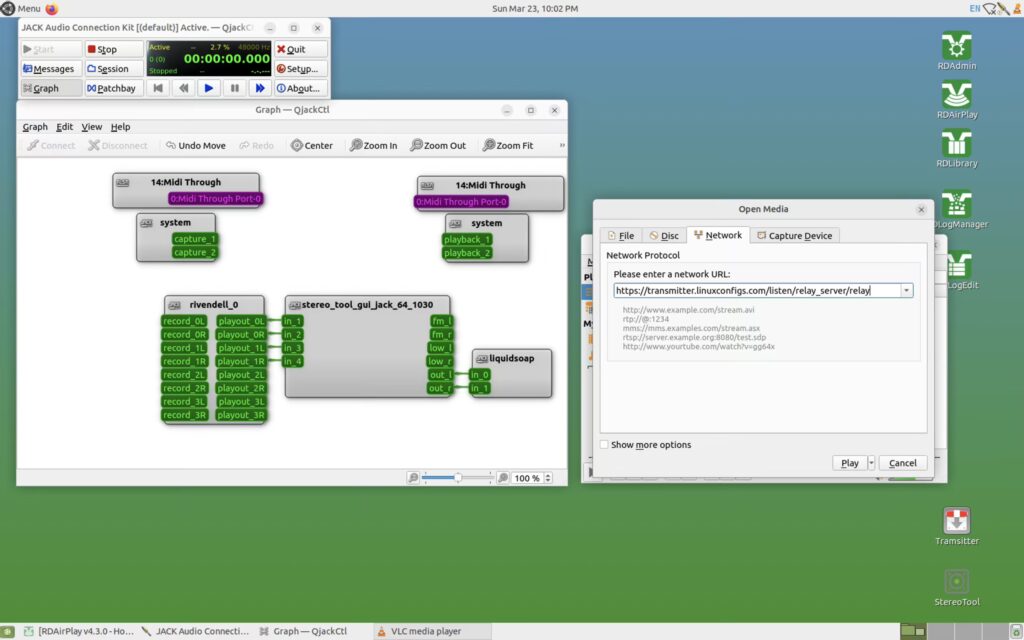
Over on your Rivendell server, open VLC, hit CTRL+N and paste this URL into the “Open Network Stream” field, and hit the “Play” button.
- Open VLC (Menu/Sound & Video/VLC)
- CTRL+N to Open Network Stream
- Paste Relay Server stream URL
- Hit “Play” button
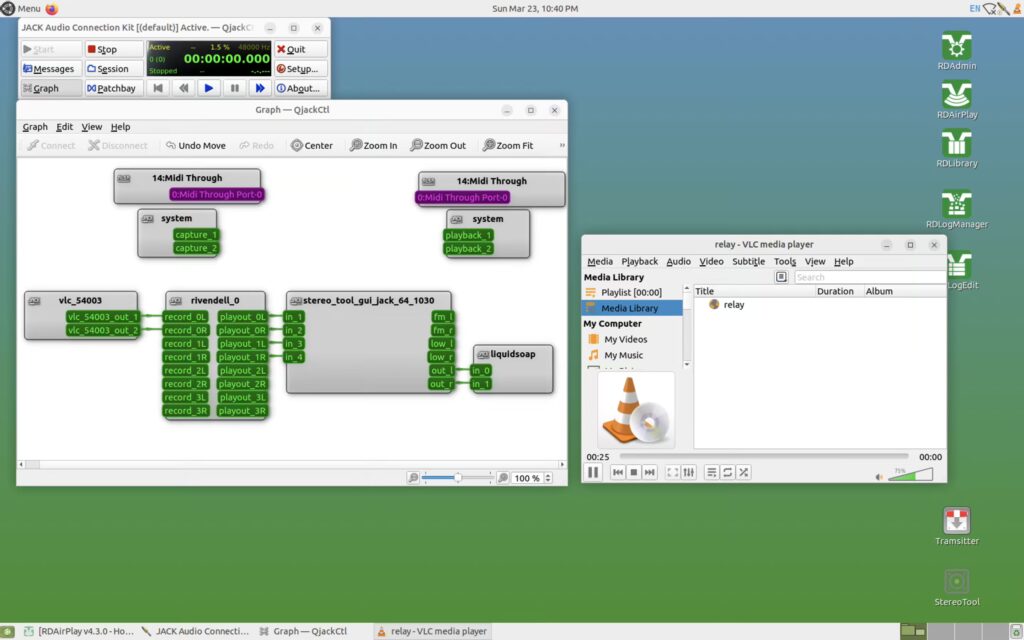
After it starts playing you can drag the link from the “Playlist” and drop it on top of the “VLC Media Library,” which will create a permanent shortcut for future LIVE broadcasts, making it easy to connect.
Visually, you’ll know it’s connected, when VLC pops up in the QJackCTL “Graph.” You may want to drag the VLC patches to the left to untangle the view — you’ll see what I mean when you connect the first time — it won’t make any difference if you don’t untangle the patches — it’s purely cosmetic.
NOTE: You won’t hear any audio until it’s on the air, so you’ll need to open the Relay Server stream URL on your phone or other device to monitor.
ALSO, keep in mind, there are multiple layers of delay, so you can’t monitor in real time. You’ll need to communicate with the talent at the remote for cues. I did this for several years in Las Vegas and it sounds FLAWLESS on the air!
Even though you can technically get audio into Rivendell now, we’re not quite finished yet, because we still need to create your primary on-air stream in Azuracast and configure BUTT.
Create Your Primary ‘Station’ Stream
This might seem redundant since your Rivendell server is already serving an icecast stream, but you definitely DO NOT want to serve public traffic on your mission critical Rivnedell server, so we’re going to secure the stream with SSL and relay it here. The main differences between your Relay Server “station” and your primary on-air “station” stream, is we aren’t going to enable Streamers/DJs, so you don’t inadvertently interrupt your primary station audio connecting from a remote. We’ll keep Public Pages enabled for the embeddable widgets. And, we’ll use your Rivendell server’s icecast URL as the source.
If you prefer a dark theme, let’s fix that really quick. On the Azuracast Dashboard, tap the little menu icon and then tap “Switch Theme.”
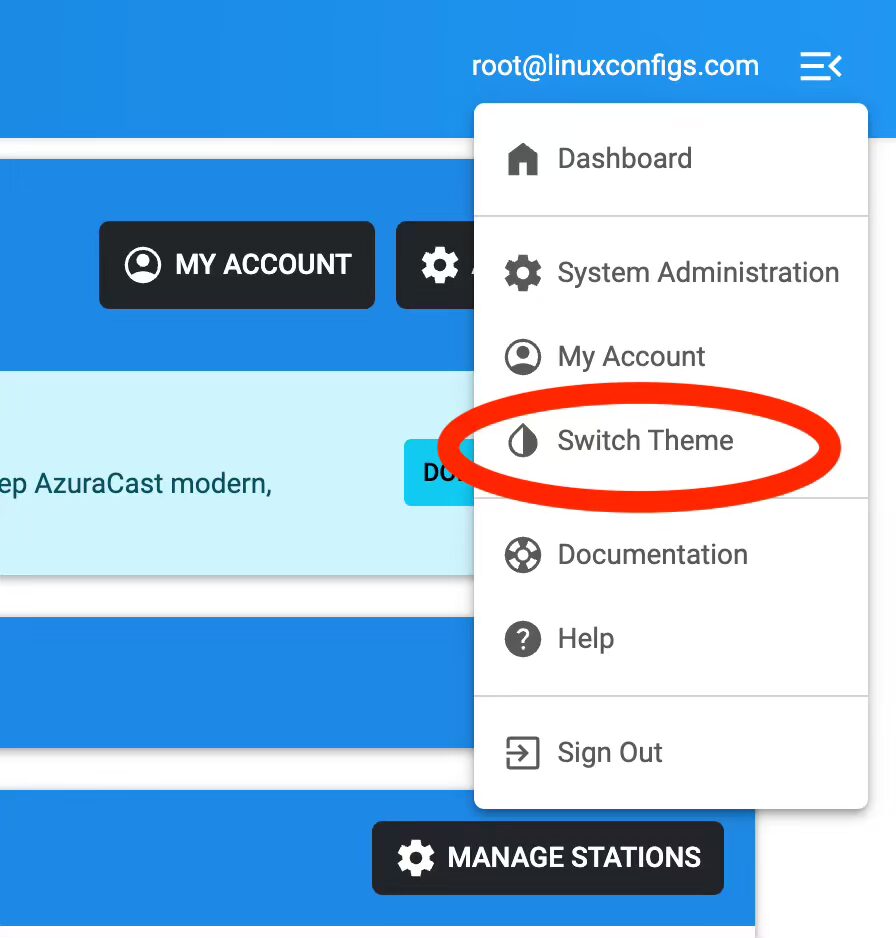
That’s better!
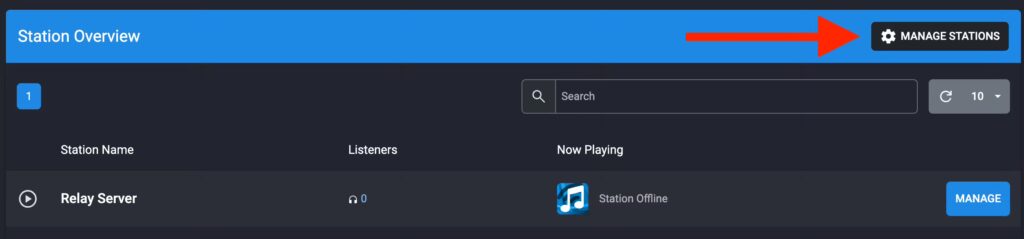
Again, from the main Dashboard, tap the “Manage Stations” button.
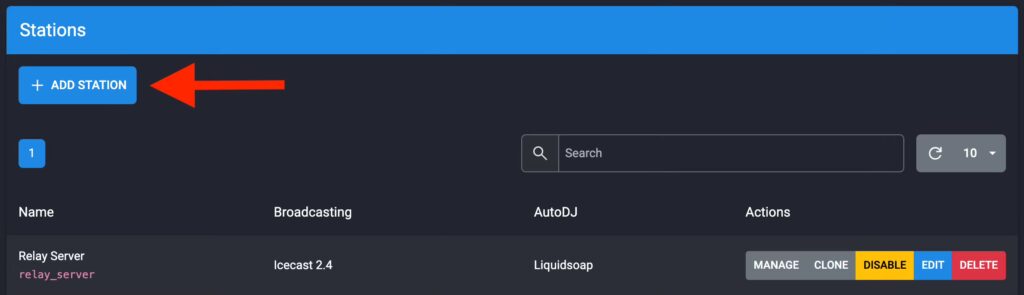
Next, tap the “Add Station” button.
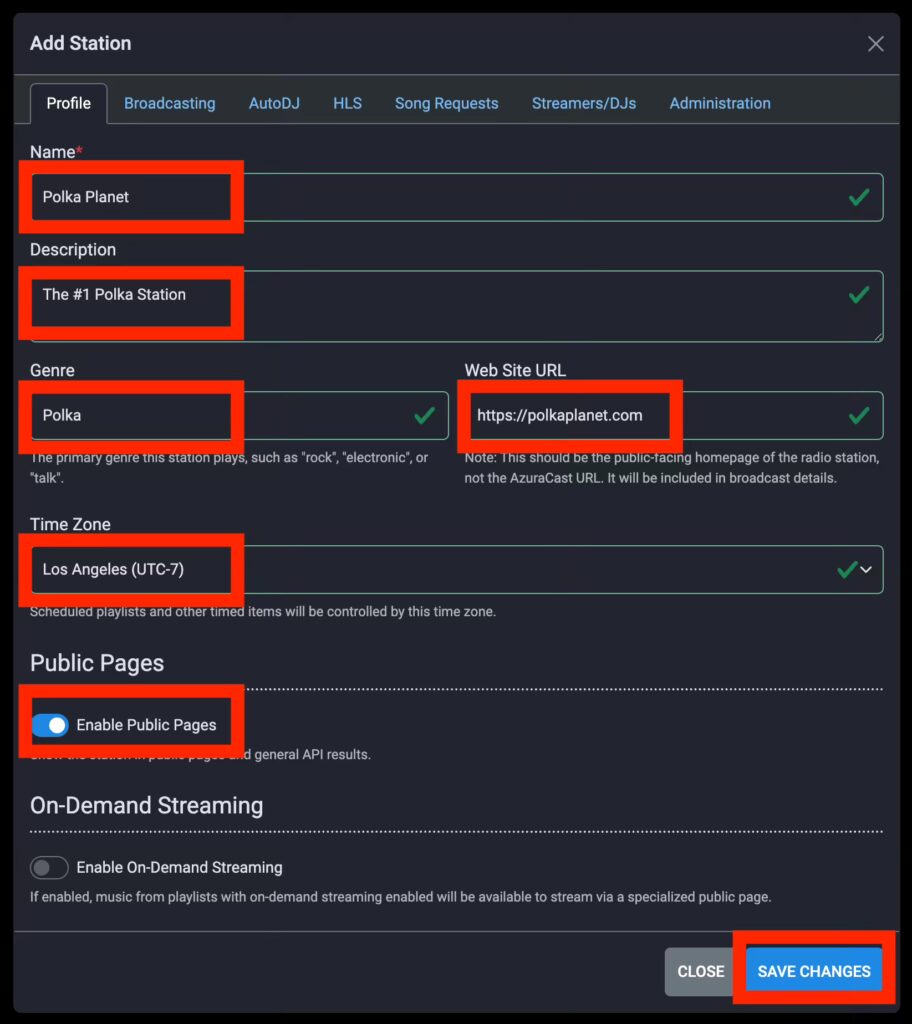
We’re going to repeat the process of adding a new station, but some of the choices will be slightly different.
- Name: Station Name
- Description
- Genre
- Public facing website including https://
- Timezone
- This time, we wanna keep Public Pages enabled. There are widgets that you can place on your website to display a player (if you don’t already have one you like) and display song history. FYI: The dark theme also applies to the widgets, but you can re-skin them with CSS.
- Click “Save Changes” button.
Now, click the button to Manage it.

Let’s clean up the Mount Point.
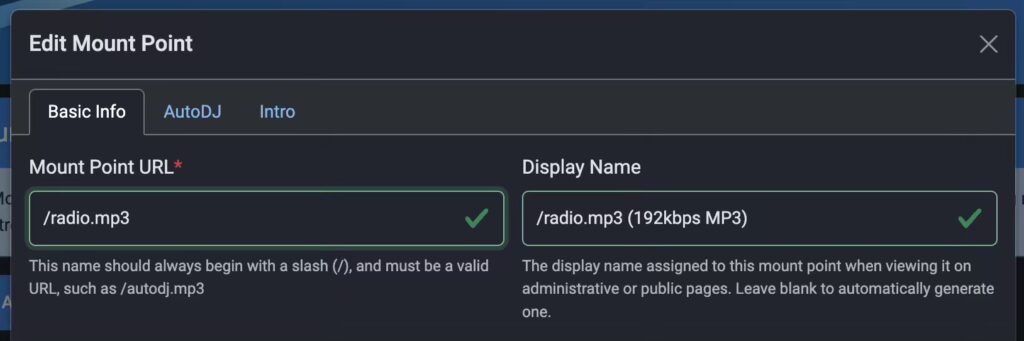
Let’s go with /live instead. Much cleaner and shorter and the .mp3 extension is informational, but isn’t really necessary unless you stream in multiple formats and bitrates.
Hit the AutoDJ tab to check the format. Technically, this doesn’t matter in the context of our primary on-air stream, because we’re not generating the stream or mounting to Azurcast like we are on the Relay Server. We’re relaying a remote icecast stream from our Rivendell server as-is. So you can just hit “Save Changes,” without making any changes.
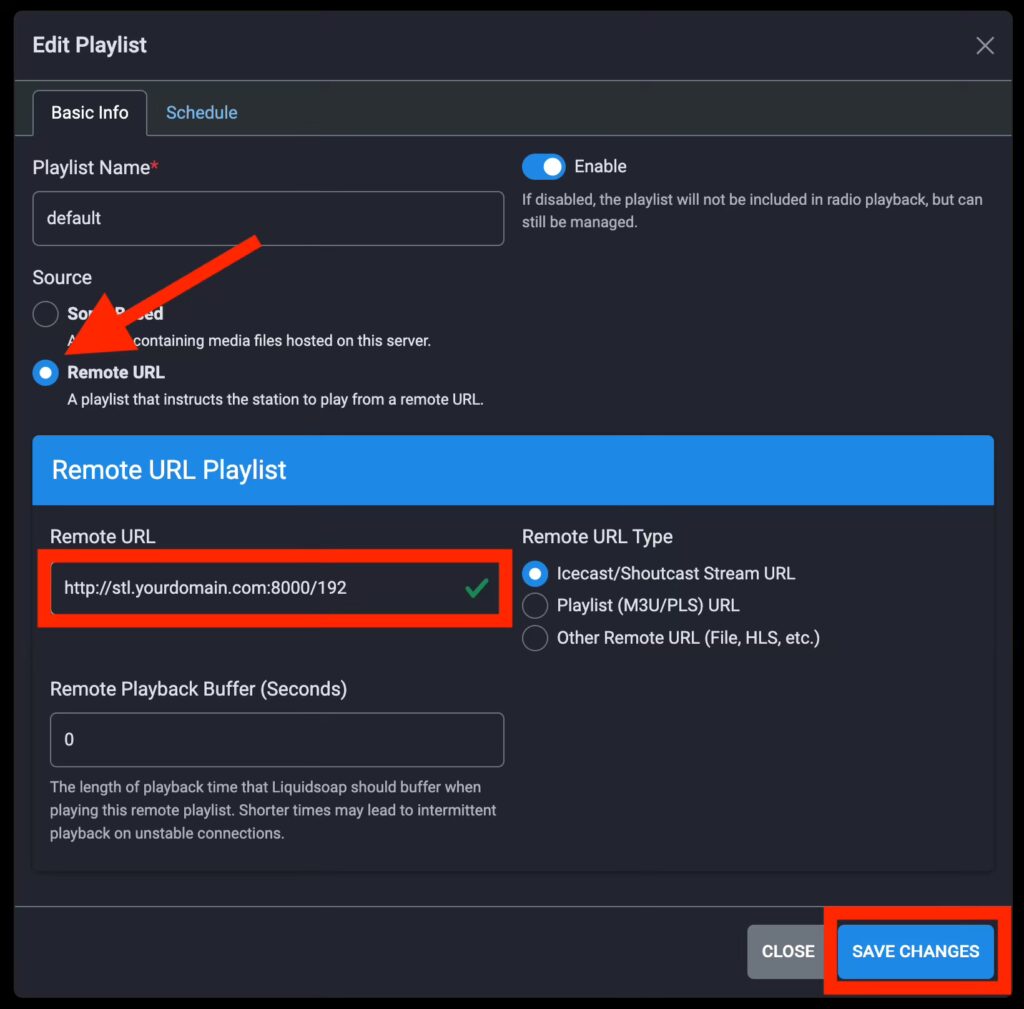
In the left navigation menu, tap “Playlists,” then tap the “Edit” button on the right. This is where we’re going to add the Rivendell server URL we’re going to be relaying.

Remember the second A-Record you created pointing to your Rivendell server? This is where you’re going to use it to relay your primary on-air stream.
- Tick the “Remote URL” button
- Add Remote URL (http, not https): http://stl.yourdomain.com:8000/192
- Tap “Save Changes” button
IMPORTANT: This is your primary on-air streaming server. Don’t add any other links in this playlist or files to the media library. Your STL is the ONLY thing that should be in this station.
Now, let’s start the station.
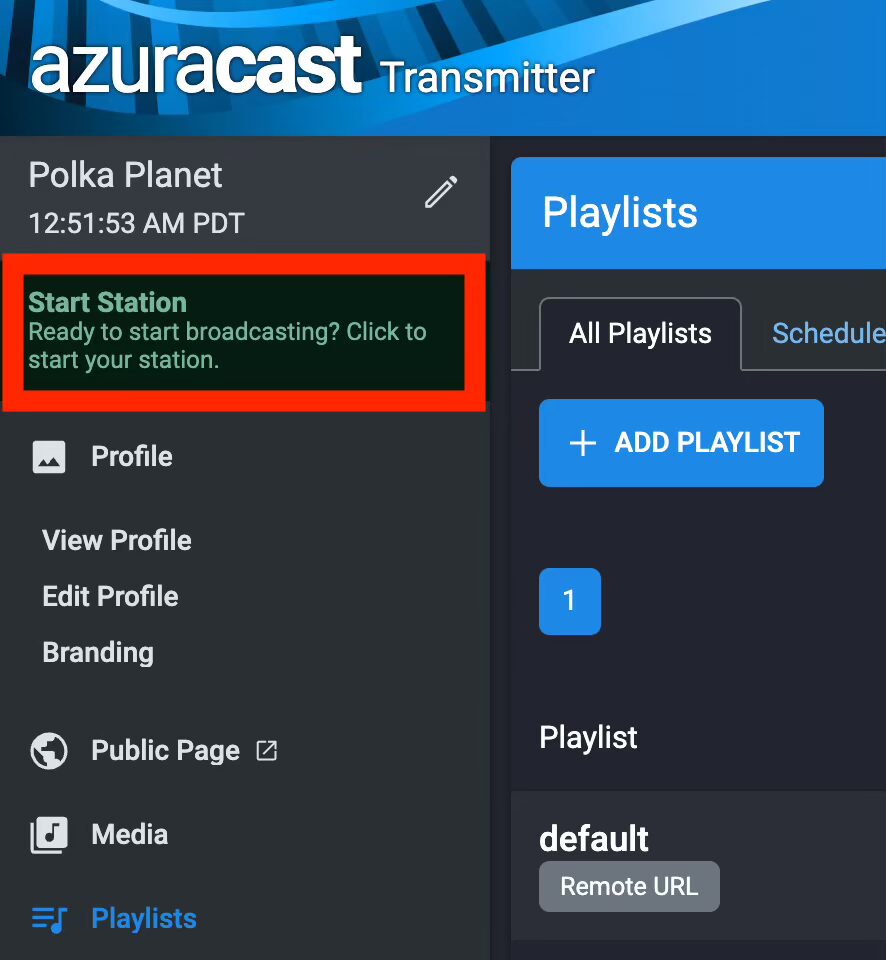
On the next page, tap the big yellow “Restart Broadcasting” button and confirm in the popup to write all of the config changes.
It can take a minute or so for everything to handshake the first time, so don’t freak out if you don’t hear any audio or see any meta.
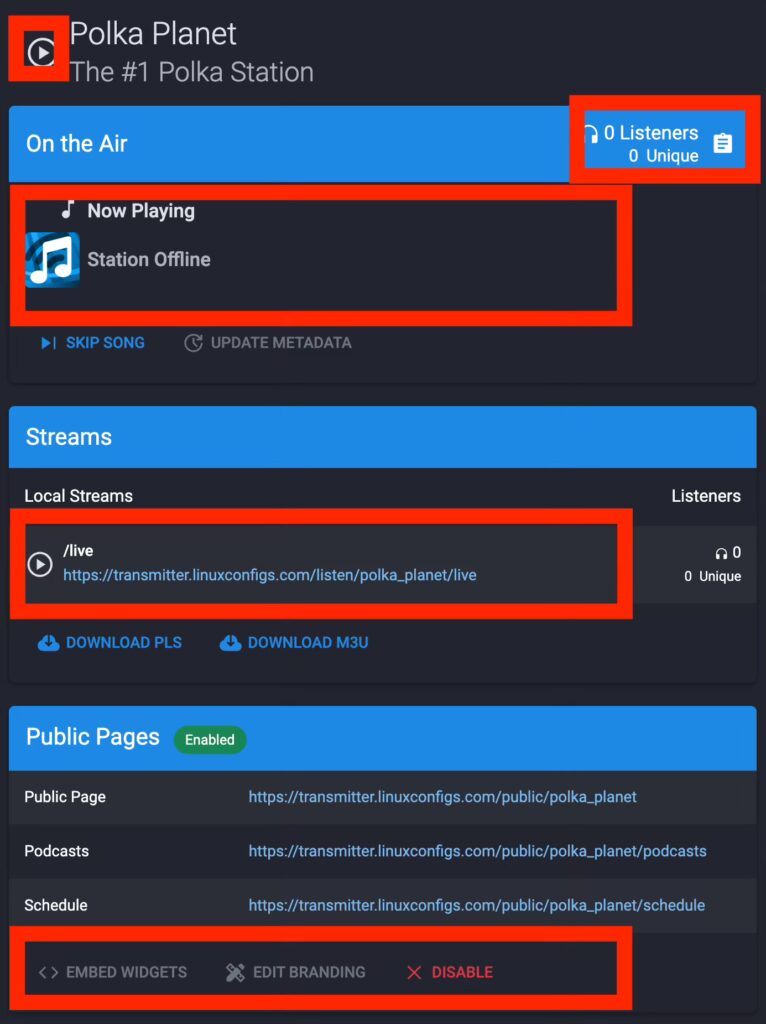
- Hit the play icon to listen.
- Tap the clipboard “Listeners” icon to see a map with listener data.
- After a minute or so, Artist / Title meta should start displaying in the “Now Playing” area.
- Your PUBLIC facing on-air stream — this is what you’ll use on your website and directories (NOT your Rivendell/STL stream URL)
- You can lightly customize the widgets and get their embed codes
Back Up Your Azuracast Config for Easy Recovery
We’ve made a lot of changes and it would be brutal if something happened and we didn’t have a backup. Thankfully, Azuracast has a built-in mechanism to easily backup your config and since ours doesn’t have any media files that need to get backed up, it’s a tiny zip file. If the server ever failed for some reason, you would perform a 1-Click Azuracast install, use scp or SFTP into your new server with Filezilla and copy that backup file, then perform a restore from a terminal. You’d be back to where we are in less than 5 minutes. I won’t walk you through the entire process, only creating and downloading your backup file for safe-keeping. Refer to the Azuracast documentation for details.
- From the Azuracast Dashboard, tap the “Administration” button
- In the “System Maintenance” menu, tap “Backups”
- You can configure automatic backups, but we’re going to take a manual one
- Tap the “Run Manual Backup” button
- In the popup, tap inside the “Storage Location” and choose the default location: Local: /var/azuracast/backups
- Give your backup a filename: Azuracast-2025-0324-0939.zip (for example)
- There is no media, so you don’t need to exclude it.
- Tap the “Run Manual Backup” button
- It should only take a couple seconds, when it’s finished, you can close the popup.
- Down below, there will be a link to download your backup file with the name you gave it.
- Click the “Download” button and save it for a future restore.
- This will preserve all of the changes you made and bring you back to where you are within minutes. Keep it somewhere safe.
- GOOD POLICY: Any time you make changes to your Azuracast config, run maintenance or install updates to the server or Azuracast, ALWAYS take a new backup.
I Like Big BUTTs and I Cannot Lie
In today’s lesson, we’re going to be discussing your BUTT… 🙄 Broadcast Using This Tool is a lightweight, cross-platform utility for streaming in multiple protocols and formats to remote servers. If you haven’t already downloaded and installed it, grab the version for the laptop that you’ll be using to connect to your Relay Server from your remote broadcasts.
NAG 1: Plug-in your Audio Interface BEFORE you open BUTT.
NAG 2: Is your Audio Interface plugged in to your laptop yet? If so, open BUTT and follow along. Grab the Azuracast Streamer/DJ connection information and user credentials you created earlier.
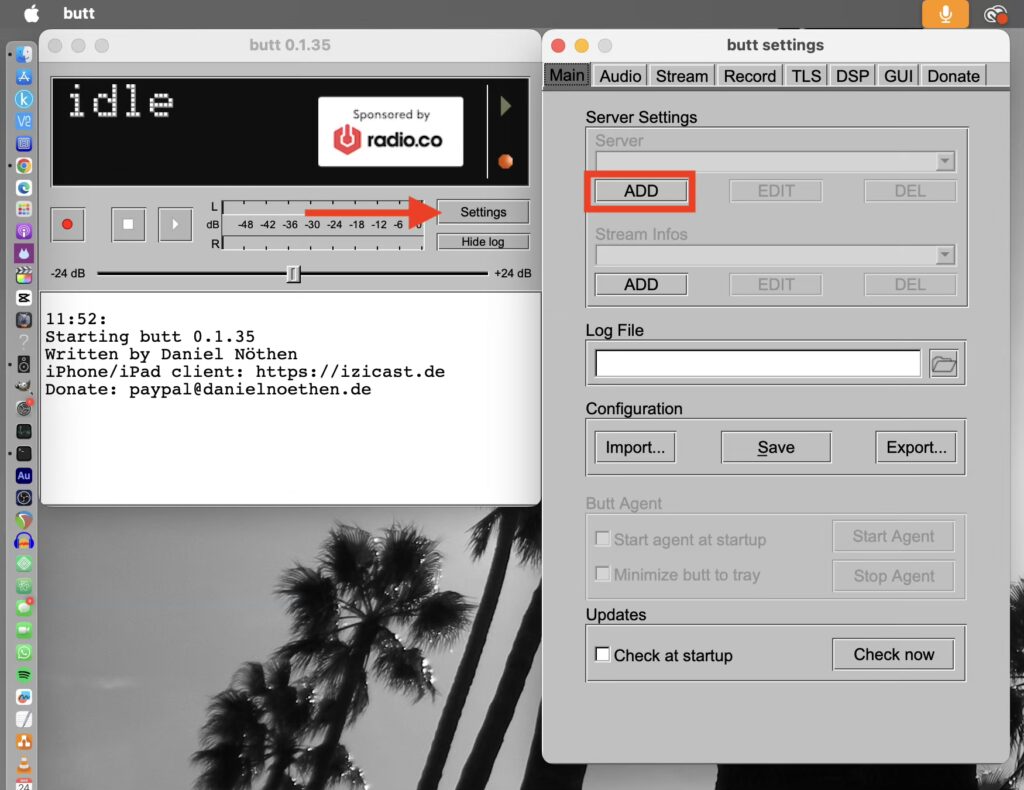
- Tap on Settings
- In the “Main” tab of the “Settings” window, tap on “ADD” under “Server Settings”
Plug in your Relay Server connection settings and user credentials

- Name: Relay Server
- Type: Icecast
- Address: transmitter.yourdomain.com
- Port: [port specified in your connection info]
- Password: [the user password you created]
- IceCast mountpoint: /
- (literally, a forward slash – nothing else)
- IceCast user: [the username you created]
- Click the “ADD” button
Now, tap on the “Audio” tab
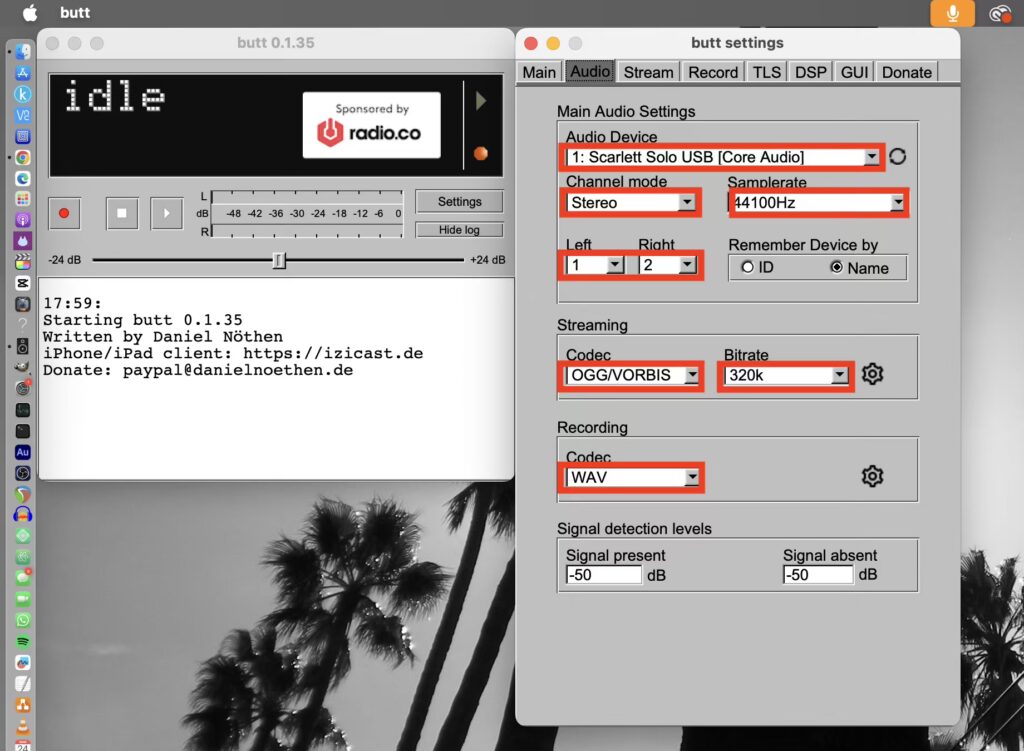
NAG 3: If your Audio Interface is already plugged in BEFORE you opened BUTT, you should see it in the “Audio Device” dropdown menu. Tap, to select it. If it’s not in the list, close BUTT, try a different USB port and repeat this step.
- Audio Device: Choose yours in the dropdown menu
- Channel Mode: Stereo
- Left: 1
- Right: 2 (if the right channel *also* shows a 1, it’s in MONO — click to change it to a 2)
- Samplerate: 44100Hz (Azuracast’s default)
- Streaming: OGG/VORBIS
- Bitrate: 320k
- Recording Codec: WAV (this setting will archive your remote-side audio in uncompressed wav) Useful for Podcasts, airchecks, etc.
BIG REMINDER: Your codec settings in BUTT and Azuracast should mirror each other, so Azuracast doesn’t have to transcode anything.
Quick Access: Azuracast Dashboard>>Manage Relay Server>>Broadcasting>>Mount Points>>Edit>>AutoDJ
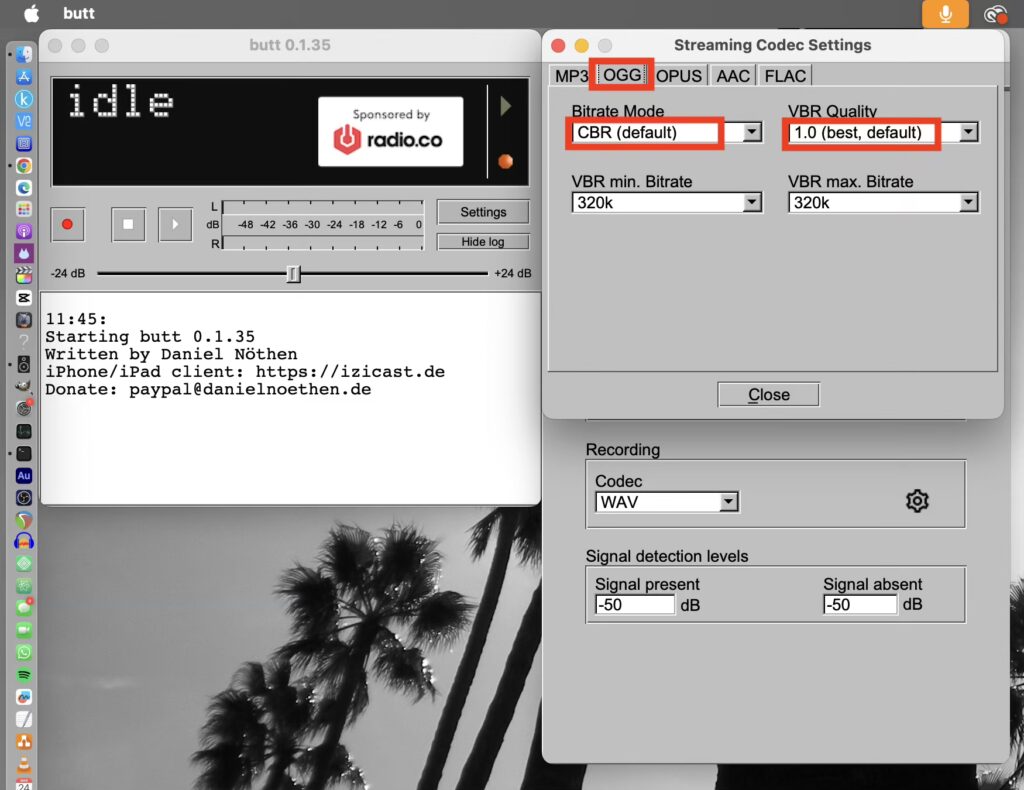
FOR REFERENCE: You can (and should) fine-tune the codec settings whenever you change a codec. Tap the gear icon next to the streaming bitrate to open and then choose the codec tab, for the codec you’re using.
- Tap the gear icon next to the streaming bitrate
- Choose the tab for the codec you’re using (OGG)
- Bitrate Mode: CBR is the default and our preference
- Then, click the “Close” button
We’re not going to need to configure every tab, only the ones we use. Let’s move on to the “Record” tab.
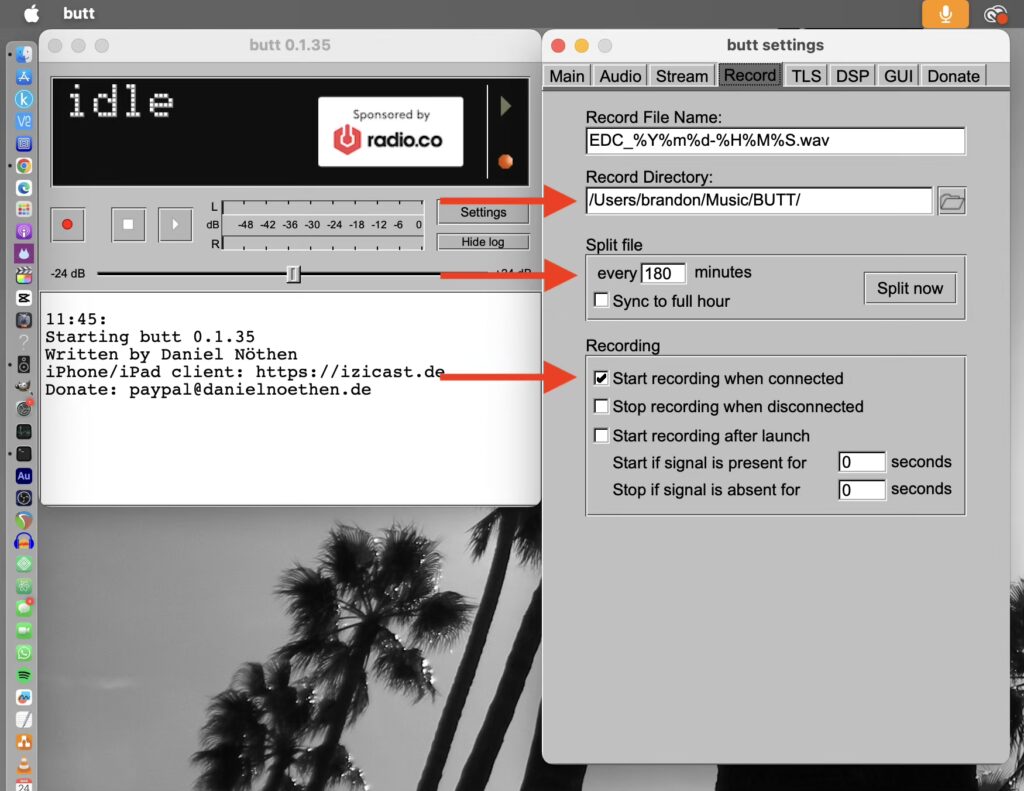
As previously mentioned, BUTT can archive your remote-side audio in uncompressed wav which is really handy. If you prefer not to, you can always UNCHECK “Start recording when connected” Otherwise, BUTT will begin recording when you connect to your Relay Server.
- You can customize the default filename in the template
- Choose the local directory where you’d like BUTT to save all recordings
- I recommend experimenting with splitting files. The majority of our live remotes are long-form DJ sets that can last 4-6 hours. Splitting them every 3 hours seems to work well for us, but may not work for you. Play with it.
- If you want to record when you connect, check “Start recording when connected”
- NOTE: Keeping the option to “Stop recording when disconnected” UNCHECKED, is insurance against accidentally stopping a recording if the connection drops for any reason. BUT, it also means you need to hit the STOP icon 2x when you disconnect from the relay server and confirm that you want to end the recording.
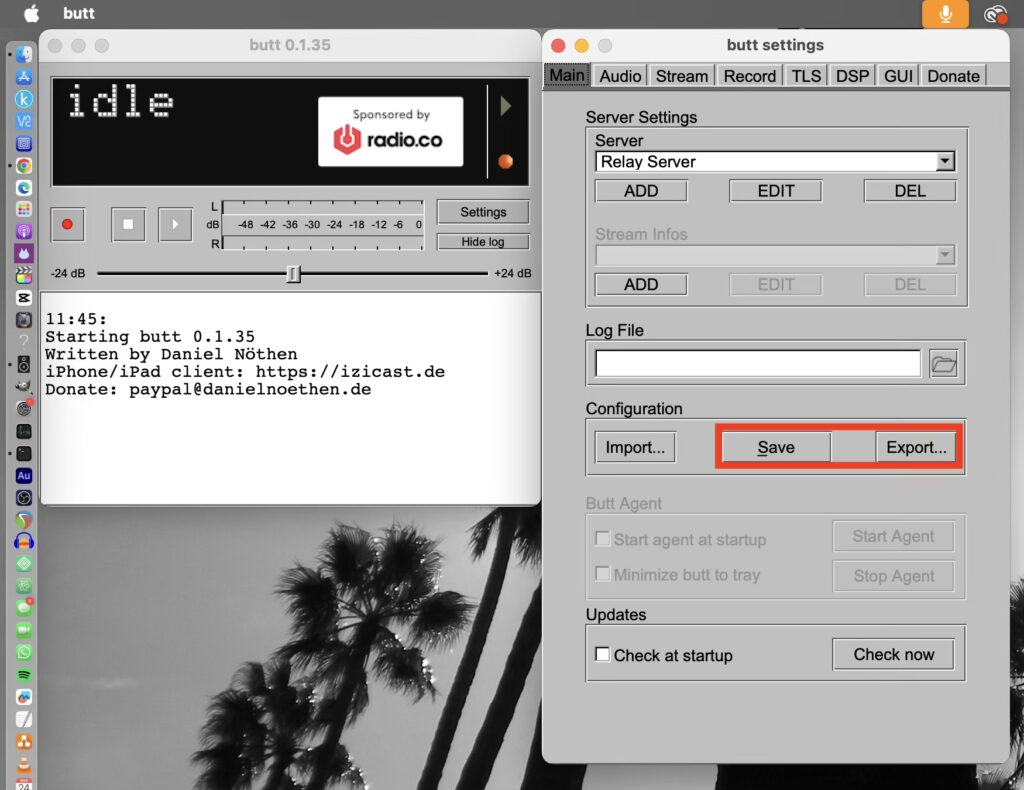
Play with the settings and figure out what works best for YOU. Don’t forget to save and export your settings occasionally.
Final steps: Connecting and disconnecting from your Relay Server.
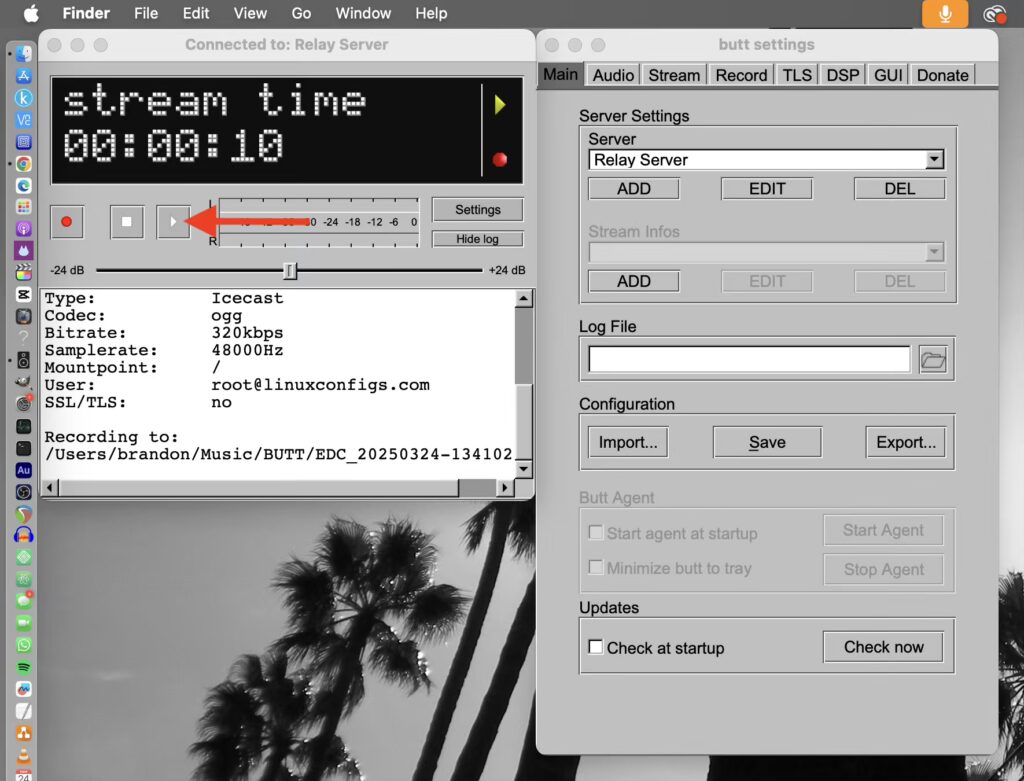
- To connect to your Relay Server, tap the “Play” icon
- Once it’s connected, you’ll see “stream time” and it will start counting how long it’s connected in the status window.
- Now, you can monitor the stream on your phone or other device with your Relay Server stream URL.
After everything is dialed in, you can close the Settings window.
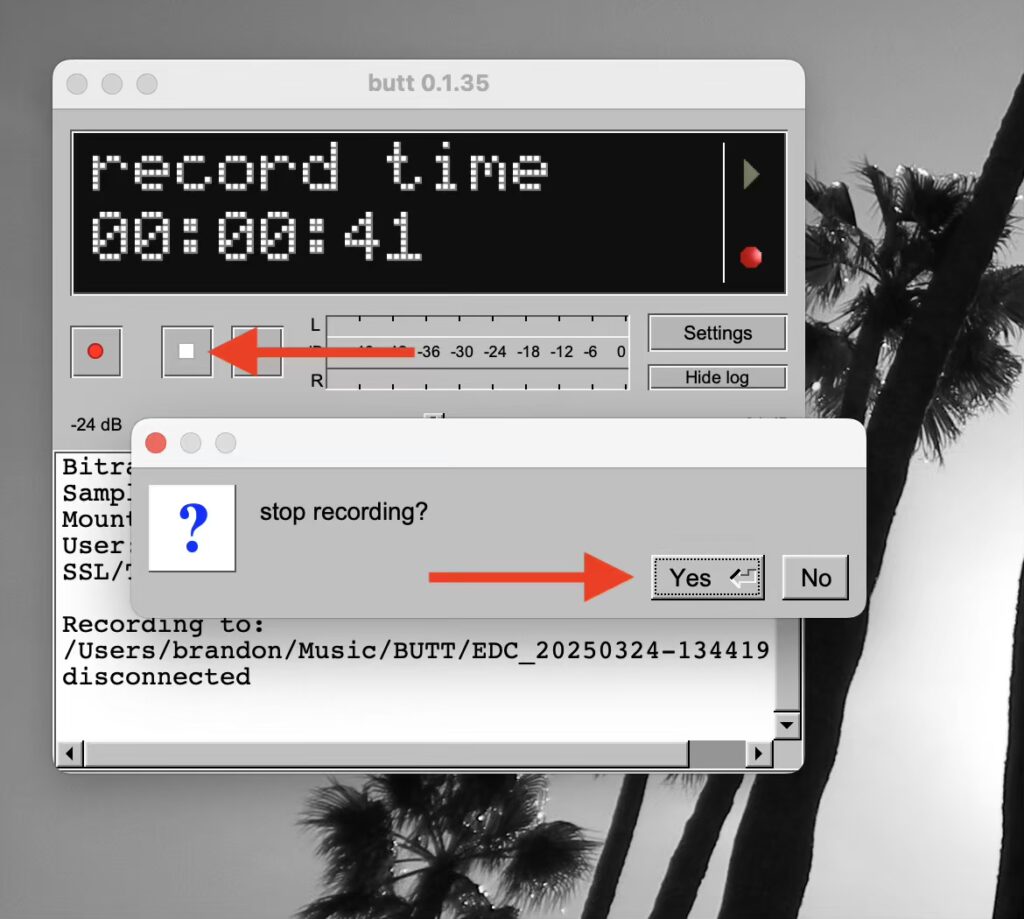
REMINDER: If you have BUTT set to Record when connected and to not to stop recording when disconnected, disconnecting and stopping the recording is a two-step process.
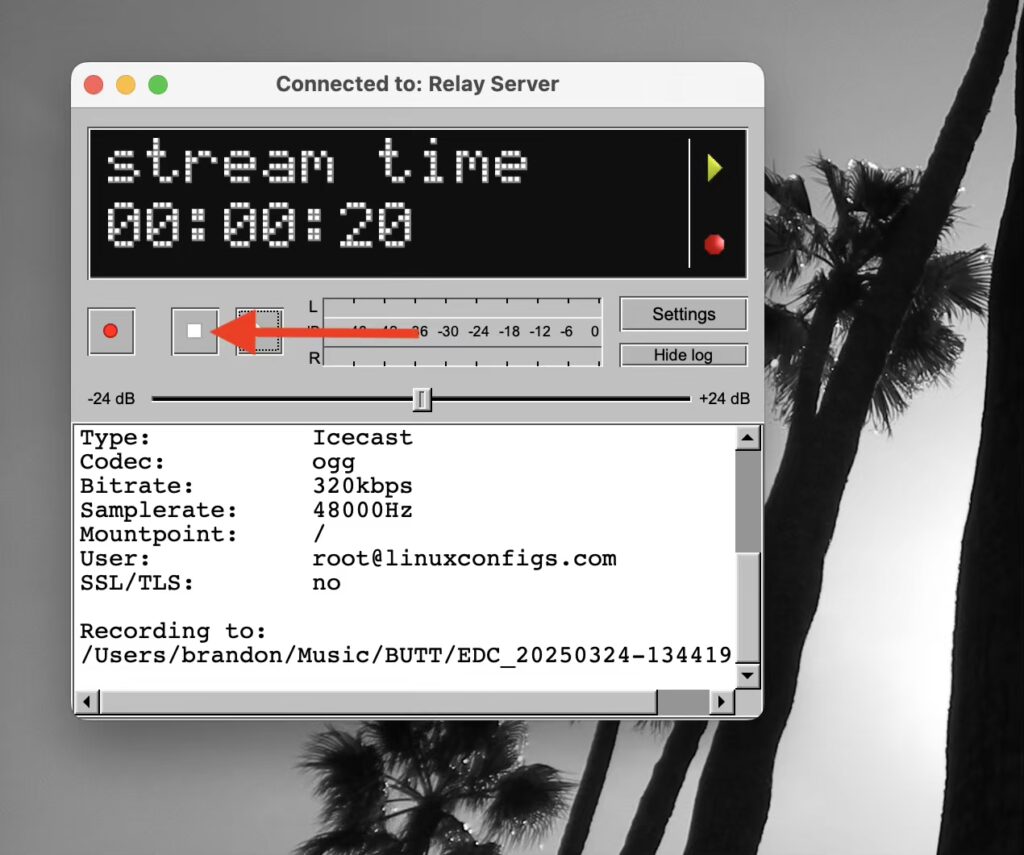
- To disconnect from your Relay Server, tap the “Stop” icon
- Then, tap it again to stop recording and confirm in the popup.
If you found any of this to be helpful, please share, comment, and use my referral links. It all makes a difference! Thank you!! 🙏🏽
YOU’RE READY TO CAPTURE LIVE REMOTE AUDIO IN RIVENDELL! 🙌🏾
CONGRATULATIONS! If you’ve established a connection to your Relay Server from BUTT, you’re ready to connect VLC from your Rivendell server to your Relay Server stream URL and capture audio for LIVE Remotes. We will now transport you BACK TO WHERE YOU CAME FROM!
Leave a Reply